本文
First Aid Steps
Cardiac or Respiratory Arrest
Treating an individual suffering from cardiac or respiratory arrest is absolutely a race against the clock. The possibility of saving the life of a person suffering from cardiac or respiratory arrest drastically drops within 10 minutes. In such an event, it is first important to immediately dial 119. The earlier you dial 119 the sooner paramedic will be able to administer life support, allowing them to also arrive quickly to a hospital. Once 119 have been called, you can receive guidance on necessary first aid until the paramedics arrive.
The national average time required by an ambulance to reach a site is 8 minutes. Remaining idle until an ambulance arrives can cost the life of one who needs help. To avoid this, it is important for all members of the community to equip themselves with the lifesaving knowledge of proper CPR and AED usage. From the citizens on the scene to the paramedics; from the paramedics to the hospital; the baton of life is passed on from one person to another in a “Life Saving Relay." In order for that Life Saving Relay to not be interrupted it takes one citizen with bravery to be the first runner, so let it begin with you.
CPR Steps
Steps
1. Check for responsiveness
- Shake or tap the person gently. See if the person moves or makes noise. Shout, “Are you OK?”
Point
- If the person does not open their eyes or slightly move, consider them “unresponsive.”
- If the person is experiencing convulsive fits, consider them “unresponsive.”
- If there is a response, ask the person if they have any complaints, then proceed with the necessary first aid.
2. Call for help
- If you are alone, call 119 and retrieve an AED (if available).
- Once you call 119, the emergency dispatcher will guide you through the proper procedures.
3. Check for breathing
Check to see if the person is breathing normally or not.
- Sitting next to the person, confirm within 10 seconds weather or not they are breathing regularly by looking at their chest movements.
Point
The following circumstances are deemed as “not breathing”
- No movement in the chest or abdominal area
- Cannot properly determine if the person is breathing within 10 seconds
- Continuous heaving and convulsion. (After cardiac arrest occurs, the victim’s chest and abdominal area may move irregularly along with heaving and convulsive breathing. This breathing is known as “Agonal breathing.” Agonal breathing is not normal breathing).
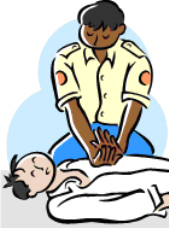
4. Chest Compression
Once you have determined that the person is not breathing normally, immediately begin chest compressions, allowing blood to travel throughout their body.
- Place both hands together on the center of the person’s chest and “strongly, quickly, continuously” compress.
- Place the hell of one hand on the breastbone- right between the nipples.
- Place the heel of your other hand on top of the first hand.
- Position your body directly over your hands and firmly press down 5 centimeters into the chest.
- Give 30 chest compressions. These compressions should be fast, hard, and continuous.
- In between compressions, let the chest rise completely each time.
- With a child give strong chest compressions a 1/3 of the chest’s height with either one or both hands.
5. Artificial Respiration (Mouth-to-Mouth Resuscitation)
After the 30 chest compressions, begin to perform mouth-to-mouth resuscitation.
1.Maintain Airway
- Open the person’s airway
- Place one hand on the person’s forehead and your middle and index finger on their chin. Slowly tilt their head up raising their chin.
Point
Make sure not to strongly compress the soft part of the person’s chin with your fingers.
2.Artificial Respiration
- With the airway ensured, use the index finger and thumb of the handing holding the forehead to pinch the person’s nose.
- Seal the person’s mouth with your mouth and blow into the mouth for at least 1 second. Check to see if the person’s chest rises.
- Temporarily remove your mouth, and proceed to give another breath.
Point
- It is ideal for the chest to rise both times after breathing into the person’s mouth, however if that does not happen, immediately continue on to chest compressions
- While performing artificial respiration, there will be delays in chest compressions. Make sure to reduce the time of those delays as much as possible.
- If available, protective covers or artificial respiration masks can be useful.
- If there is hemorrhaging from the face or mouth or direct mouth-to-mouth resuscitation cannot be performed, omit it and continue to only do chest compressions.
6. Continuation of CPR (Chest Compression & Artificial Respiration)
- Continue giving 30 chest compressions followed by 2 breaths.
- Repeat the chest compressions and breaths (30:2 cycle) until the paramedics arrive.
Point
Performing continuous chest compressions can be tiring, so if there are two are more people take turns aiming for 1-2 minute intervals.
Performing CPR should stop under the following circumstances:
- Once the paramedics have arrived to perform CPR
- Once the person’s eyes open and they begin to breathe normally
Chest Compressions 30 Times
- Center of the chest (between the nipples) compress
- Strongly (firmly press down 5 centimeters into the chest)
- Quickly (At a tempo of 100 presses per minute)
- Continuously (30 times)
- Relax in between compressions (however do not remove your hands from the person’s chest)
Artificial Respiration 2 Times
- Breath into the person with mouth-to-mouth while pinching their nose shut
- Watch for rise in the chest
- Blow into the mouth for one second
- Repeat
- Perform within 10 seconds
Point
In the case that the person is unresponsive but is breathing normally:
Recovery Position
- In the case that the person is unresponsive however is breathing normally, ensure their airway and wait for the paramedics to arrive. Similar to ensuring their airway, tilt their head up raising their chin.
- To avoid the risk of the person asphyxiating by vomit, or if you have to leave their side momentarily, place them on their side. This is called the Recover Position.
AED Steps
Steps
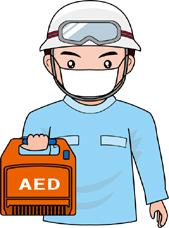
- If an AED arrives while in the process of performing CPR, immediately prep the AED for use.
- Although there are various kinds of AEDs, the procedure of using them is the same. One an AED is turned on a voice message will sound and a lamp will turn on. The machine will walk you through the proper steps so please calmly follow them.
7. Arrival & Set up of AED
- Place the AED near the person
- Place the AED near the person. Take the actual AED machine out from its case.
- Turn on the AED’s power
- Open the top of the AED and press the power button. There are some models that automatically turn on once the top has been opened.
- When the power is turned on follow the voice and light prompts and operate accordingly.
- Paste on electrode pads
- Remove clothing and expose the person’s chest.
- Open the electrode pads package and proceed to remove the adhesive backing from them. Apply the pads to the chest.
- Depending on the model there should be a lit outlet on the AED to insert the pad’s cables.
Point
- Place one pad on the upper right section of the chest and the other on the lower left section of the body (Simply follow the pictures on pads for proper placement).
- Even in the case of pasting the pads on the body, if possibly, please continue with chest compressions
- Place pads firmly on the person’s skins so there are no gaps in between. Be careful as to not place pads over accessories.
- Regardless of model, please use “Child Mode” and children’s use pads for children, and “Adult Mode” and adult use pads for adults.
8. Electrocardiogram Analysis
- The AED machine will prompt you not to touch the person and automatically begin the electrocardiogram analysis. At that time inform surrounding parties to back away from the person.
- Some models require you to press a button in order to begin the electrocardiogram analysis.
- In the case the AED voice prompt informs you that no shock is necessary, immediately proceed in performing chest compressions again.
9. Defibrillation
- Once the AED has determined that electric shock is necessary it will automatically begin charging, which will take time.
- When fully charged, the voice prompt will tell you to press the shock button. The shock button should then light up.
- Make sure no one is touching the person before pressing the shock button.
Point
Before pushing the shock button, make sure you are a safe distance away from the person.
The person’s arm or entire body will momentarily convulse once shock has been emitted.
10. Resume CPR
- After the AED administers the electric shock, the automated voice will prompt you to immediately resume chest compressions.
Point
- Even when operating the AED for electrocardiograms or electric shock, it is important to shorten the pauses during chest compressions as much as possible.
11. AED Steps & CPR Repetition
- After 2 minutes of CPR, the AED will analyze again. During the AED voice will prompt surrounding parties to move away from the person.
- Repeat the last 3 steps 8.、9.、10. until help or paramedics arrive.